Saturday, January 14, 2012

Membuat widget hanya muncul pada postingan

Membuat widget hanya muncul pada postingan:


Sebelumnya saya pernah menulis tentang bagaimana membuat widget hanya muncul pada homepage,kali ini kebalikan dari itulah yang mau aq share,so kamu bisa meletakkan widget yang tidak kamu suka hanya pada postingan,biar blog kamu lebih menarik dengan jalan meletakkan sebagian widget kamu hanya pada postingan,kalo buatku sih tampilan homepage harus lebih cantik..daripada waktu postingan/item. ok langsung saja, ini cara membuat widget hanya muncul pada postingan:

  1. Masuk ke blogger.com
  2. Log-in dengan username dan password kamu
  3. Menuju layoutEdit HTMLCentang "expand widget template" nya, karena kalau tidak kode di bawah nanti tidak akan keluar.Sebenarnya kita hanya perlu menambah kan 2 tag kode saja,lihat kode dibawah ini:


<b:widget id='HTML1' locked='false' title='Blog Upp' type='HTML'>
<b:includable id='main'>
<b:if cond='data:blog.url != data:blog.homepageUrl'>
<!-- only display title if it's non-empty -->
<b:if cond='data:title != ""'>
<h2 class='title'><data:title/></h2>
</b:if>
<div class='widget-content'>
<data:content/>
</div>

<b:include name='quickedit'/>
</b:if>
</b:includable>
</b:widget>


Lihat kode yang berwarna merah tadi,itu adalah selipan kedua tag kode tadi, dan warna kuning yang berkedip itu adalah judul wigetkamu. silahkan aja sesuaikan dengan judul widget yang ada pada blog kamu jika kamu pengen widget tersebut hanya tampil hanya pada postingan.

Tuesday, December 27, 2011

Cara memasang mode stanby / Energy Saving Mode Pada Blog

Cara memasang mode stanby / Energy Saving Mode Pada Blog

Cara memasang energy saving mode pada blog sangat mudah, jika kamu pasang script ini dan membiarkan blogmu itu tanpa aktivitas maka script ini akan bekerja,yaitu akan seperti menampilkan screensaver hitam,lihat gambar dibawah ini! ini adalah tampilan dari blog yang dipasang script energy saving mode:

Cara memasang Energy Saving Mode Pada Blog

Nah,bagimana sih cara Cara memasang Energy Saving Mode Pada Blog? ikuti langkah2 dibawah ini!

Untuk pengguna Blogger/Blogspot:

  • Login ke halaman admin [blogger.com]
  • Klik Rancangan
  • kemudian add widget (boleh di bagian manapun yang sesuai, coz tidak ditampilkan penuh)
  • pilh widget jenis html/javascript, judul boleh dikosongkan
  • paste kode berikut:
    <script language="javascript" type="text/javascript" src="http://infonetmu.googlecode.com/files/energysavingmode.js"></script>
  • kemudian save/simpan.
Nah,mudah kan.. selamat mencoba!

Thursday, December 22, 2011

Memberi gambar background pada shoutmix

Memberi gambar background pada shoutmixpada :

Buku tamu ada bermacam-macam,kamu bisa membuatnya buku tamu pada blog kamu sesui keinginan kamu,untuk tata letaknya kamu juga bisa mengaturnya juga,misalnya membuat buku tamu secara tersembunyi dengan rolling widget maupun dengan gaya ajax style,Nah kali ini saya akan memberi tutorial tentang memberi gambar background pada shoutmix kamu,untuk lebih jelas,lihat gambar dibawah ini:

Memberi gambar background pada shoutmix

Indah bukan? langsung saja,cara memberi gambar background pada shoutmix adalah sbb:

  1. Login ke blog kamu.
  2. Klik rancangan.
  3. Klik Add a Gadget HTML/ Javascript
  4. Copy code dibawah ini:
    <div id="edited" style="width:250px; height:400px; background:url(http://www.soiphone.com/uploads/200902/f/1235098340.jpg) no-repeat left top; padding-top:-5px; padding-left:0px; position:relative" align="center">
    <!-- Begin ShoutMix - http://www.shoutmix.com -->
    <iframe frameborder="0" title="CHEKGUISZA" height="400" src="url shoutmix anda" id="r" style="filter:alpha(opacity=50);opacity:0.55;-moz-opacity:0.55; display:block; " scrolling="auto" width="250">
    <a style="" href="url shoutmix anda">View shoutbox</a>
    </iframe>></div>
    <!-- End ShoutMix -->
  5. Save
NB:
Warna hijau adalah ukuran untuk shoutmix kamu,sesuaikan dengan kebutuhanmu
Ganti url shoutmix dengan url shoutmix kamu,untuk mengetahui url shoutmix kamu,silahkan arahkan cursor pada link refress shoutmix kamu lalu klik kanan dan copy link location.
Warna Kuning adalah url dari gambar background shoutmix kamu, kamu boleh juga coba beberapa url dibawah ini:
http://www.bestiphonewallpapers.com/bulkupload/081109/Cartoon/PinkHelloKitty.jpg
http://www.dreamstime.com/blue-background-thumb2315107.jpg
http://www.dreamstime.com/floral-background-thumb4863792.jpg

Sunday, December 18, 2011

cara Menampilkan hanya judul posting saja pada label

cara Menampilkan hanya judul posting saja pada label

Label pada blogger adalah salah satu navigasi untuk mengetahui berbagai macam isi daripada sebuah blog,label bisa dibuat tag cloud , maka akan muncul judu-judul postingan yang susuai dengan label tersebut,tapi jika yang tampil pada halaman label tersebut adalah judul posting beserta seluruh isi artikel maka halaman label itu akan menjadi sangat panjang,dan ini malah membuat sulit pengunjung untuk mengetahui isi dari blog itu,lalu bagaimana cara agar judul posting saja pada halaman label?

Lihat halaman label dari blog mh-bayu ini seperti gambar dibawah ini:


Nah,salah satu cara untuk membuat halaman label seperti diatas  caranya sangat mudah, silahkan baca dan ikuti langkah2 cara Menampilkan judul posting saja pada label dibawah ini!

  1. Masuk ke dashboard > Design/Rancangan > Klik 'expand widget template'.
  2. Cari kode: <b:include data='post' name='post'/> (Ctrl+F)
  3. Ganti dengan script ini:

    <!--Judul post saja di label-->
    <b:if cond='data:blog.searchLabel'>
    <h3 class='title-only'><a expr:href='data:post.url'><data:post.title/></a></h3>
    <b:else/>
    <b:if cond='data:blog.pageType == "archive"'>
    <h3 class='title-only'><a expr:href='data:post.url'><data:post.title/></a></h3>
    <b:else/>
    <b:include data='post' name='post'/>
    </b:if>
    </b:if>
    <!--infonetmu.blogspot.com-->

  4. Save template HTML.
  5. Coba dicek hasilnya pada halaman label kamu.
Good luck!!!

Thursday, December 15, 2011

Membuat atau menambah smile untuk CBOX

Membuat atau menambah smile untuk CBOX:


Sobat Blogger pada hari yang lalu kita semua tidak bisa memakai shoutmix kita seperti biasa karena shoutmix kita tidak bisa menampilkan link pengunjung yang akibatnya banyak yang beralih ke shoutbox ataupun Cbox nah disini oppie bukan mau menerangkan bagaimana memasang soutbox atau Cbox karena sudah pernah oppie bahas ,SAYA mau menerangkan bagaimana menambah smile pada Cbox yang akan lebih keren lagi dari pada smile bawan dari Cbox .Langsung aja sobat caranya sobat masuk ke Cbox sobat kemudian login setelah login pada menu option sobat masuk pada tab smile nah disana sobat bisa puas2in edit smile sobat, kalo sudah di save kemudian di publish setelah selesai dapatkan kode htmlnya lalu copy pastekan di blog sobat pada kode Cbox sobat yang terdahulu sekarang lihat hasilnya mantab kan

contoh kode yang oppie dapatkan buat smile Cbox


http://www.jakarta-blogs.net/wp-includes/images/smilies/25.gif
http://www.jakarta-blogs.net/wp-includes/images/smilies/8.gif
http://www.jakarta-blogs.net/wp-includes/images/smilies/2.gif
http://www.jakarta-blogs.net/wp-includes/images/smilies/1.gif
http://www.jakarta-blogs.net/wp-includes/images/smilies/10.gif
http://www.jakarta-blogs.net/wp-includes/images/smilies/16.gif
http://www.jakarta-blogs.net/wp-includes/images/smilies/9.gif
http://www.jakarta-blogs.net/wp-includes/images/smilies/21.gif
http://www.jakarta-blogs.net/wp-includes/images/smilies/22.gif
http://www.jakarta-blogs.net/wp-includes/images/smilies/17.gif
http://www.jakarta-blogs.net/wp-includes/images/smilies/4.gif
http://www.jakarta-blogs.net/wp-includes/images/smilies/5.gif
http://www.jakarta-blogs.net/wp-includes/images/smilies/7.gif


masukan alamat limk ini dan lihat hasilnya pada Cbox sobat,kalo masih binngung jangan di terusin saya juga binggung ngejelasinnya hehe

Wednesday, December 14, 2011

Cara menghapus pesan di Cbox dan melihat IP Cbox


Sudah ada buku tamu atau guest book kan di blog kamu? buku tamu Selain bisa dibuat tersembunyi, Buat temen2 yang ingin tau cara melihat IP pada cbox,ternyata caranya sangat mudah,kamu bisa menghapus juga pesan spam yang ada di cbox kamu.

Untuk melihat IP caranya sebagai berikut:

Silahkan log ini di akun cbox kamu!,maka kamu akan melihat tampilan seperti dibawah ini:


Cara menghapus pesan dan melihat IP Cbox

Klik message,maka akan terlihat gambar seperti dibawah ini:


Cara menghapus pesan dan melihat IP Cbox

Nah,dari situ kamu bisa melihat IP pengirim pesan cbox kamu,serta kamu bisa menghapus pesan2 yang tidak kamu inginkan. semoga bermanfaat!

Monday, December 12, 2011

Cara Membuat blog reload atau refresh sendiri

Cara Membuat atau blog reload sendiri


Refresh atau reload pada Blog itu menurut saya penting, seperti pentingnya refresh pada komputer.
Yups langsung saja ya Cara Membuat blog reload atau refresh sendiri


1. login Blog
2. rancangan >> edit HTML
3. cari kode ]]></b:skin>
4. lalu taruh kode dibawah ini dibawah kode ]]></b:skin>
<meta content='300' http-equiv='refresh'/>

5. simpan

NB : pada angka 300 menunjukkan bahwa setiap 300 detik blog/website akan secara otomatis merefreshnya.

Ok sekian Cara Membuat blog reload atau refresh sendiri
Semoga bisa bermafaat bagi sobat,,

Thursday, December 8, 2011

Menampilkan foto profil pada komentar blog

Menampilkan foto profil pada komentar blog:
Terkadang disetiap template pada blogger yang kita download tidak pasti menampilkan foto profil/avatar pada komentar blognya,termasuk pada blog saya ini,sejak awal tidak menampilkan avatar pada komentarnya,nah kali ini saya akan memberi tutorial tentang cara menampilkan foto profil pada komentar blog kamu.


Menampilkan foto profil pada komentar blog


Langsung saja,cara menampilkan foto profil pada komentar blogger caranya sebagai berikut:


  1. Login ke blogger, setelah masuk klik pengaturan, lalu pilih pengaturan komentar.
  2. Pada pilihan Tampilkan gambar profil dalam komentar? sobat pilih ya.
  3. Lalu klik simpan setelan. Sampai ada keterangan Setting Telah Berhasil Disimpan. Dan lihat hasilnya, Silakan dicoba dengan menulis komentar dengan ID blogger sobat pada salah satu posting. apakah gambar/foto profilnya sudah muncul alias terlihat?Jika terlihat, berarti cara menampilkan foto profil/avatar komentar di blogger cukup sampai disini. Sebaliknya, jika gambar profilnya masih belum muncul juga. Sobat perlu melakukan langkah tambahan sebagai berikut:
  4. Masih dalam keadaan login. Klik rancangan, lanjut dengan mengklik Edit html.
  5. Untuk mengantisipasi jika nanti terjadi kesalahan. Backup template dengan cara: klik link download template lengkap.
  6. Setelah selesai, beri centang pada kombo disamping expand template widget
  7. Selanjutnya cari kode:


    ]]></b:skin>


  8. Setelah ketemu, tepat diatasnya taruh kode berikut:


    #comments-block .avatar-image-container img {background: #fff url(https://blogger.googleusercontent.com/img/b/R29vZ2xl/AVvXsEjowmUOcPqFx0JP8jyRwyt5OYlHbrFV_MIguKqqaOQNRZjBicrsLNuMZD5izhDfXVGcoBE2-KrzcjLJ8zLeS821oEkZquZZayFL1kX0Qltj_zEnKCg1qUzCbTEkU7dPcMdNXJZAjAxVwjbL/) no-repeat left top; width:35px;height:35px}


    Pada teks berwarna merah adalah URL gambar avatar yang disimpan pada file hosting. Sobat bisa menggantinya dengan avatar pilihan sobat,kode merah itu adalah tampilan avatar untuk anonimous pada blog kamu.


  9. Lanjut dengan mecari kode:


    <dl id='comments-block'>


  10. Hapus kode tersebut lalu ganti dengan kode berikut:


    <dl expr:class='data:post.avatarIndentClass' id='comments-block'>


  11. Masih belum selesai, terakhir cari:


    <a expr:name='data:comment.anchorName'/>


  12. Lalu hapus dan ganti kode tersebut dengan

    kode seperti dibawah ini:


    <b:if cond='data:comment.favicon'>

    <img expr:src='data:comment.favicon'/>

    </b:if>

    <a expr:name='data:comment.anchorName'/>

    <b:if cond='data:blog.enabledCommentProfileImages'>

    <div expr:class='data:comment.avatarContainerClass'>

    <data:comment.authorAvatarImage/>

    </div>

    </b:if>


  13. Selesai mengutak-atik kode diatas. Langkah terakhir Klik simpan template.


Jika berhasil, akan muncul keterangan perubahan anda telah disimpan 'lihat blog'.


Untuk melihat hasilnya. lakukanlah ujicoba dengan memberi/mengetik komentar pada salah satu postingan blog sobat dengan ID blogger (dalam keadaan login). Otomatis foto profil akun blogger sobat akan terlihat. Coba juga dengan ID anonim atau NAME/URL. Maka yang muncul adalah gambar avatar yang sudah ditentukan oleh sobat.


Selamat mencoba!


Tuesday, December 6, 2011

Membuat Kotak banner berjajar secara horisontal


Banner adalah iklan yang tampil didalam halaman website. Banner ditempatkan pada posisi yang menarik sehingga pengunjung dengan mudah melihatnya dan jika klik banner tersebut maka akan muncul informasi yang relevan atau masuk ke website Anda.

Dalam memasang banner hal yang perlu diperhatikan adalah penataan yang strategis agar mudah dilihat dan disesuaikan dengan komposisi template web. Jadi tidak asal tempel karena mata pengunjung tidak suka melihat seuatu yang kurang menarik.

Pemasangan banner iklan dapat disusun secara vertical dari atas ke bawah juga secara horizontal arah menyamping dari kiri ke kanan. Tergantung selera masing-masing pemilik blog. Tapi saya pribadi lebih suka pada susunan yang horizontal menyamping karena akan langsung terlihat semua tanpa harus memutar scroll mouse, apalagi bila ada banyak banner yang akan dipasang.

Simple saja sebenarnya menata banner agar dapat dipasang berjajar menyamping horizontal memerlukan tips khusus, yaitu dengan memanfaatkan fungsi table.
Berikut ini kode yang diperlukan :

<table border="0" cellpadding="2" cellspacing="0" style="border-collapse: collapse"
border width="383">
<tr>
<td>kode banner1</td>
<td>kode banner2</td>
<td>kode banner3</td>
</tr>
</table>

Tetapi perlu diingat usahakan ukuran bannernya sama, misalnya jika banner 1 berukuran 125x125 px maka banner ke-2 dan ke-3 juga 125 x 125 px, tujuannya agar setelah jadi akan terlihat rapih.

Sunday, December 4, 2011

Store Ready in App Infinity Blade II Game officially available

Infinity Blade II Game

Infinity Blade II is now available on the App Store. After introduced last October at the Let's Talk iPhone, the game is back showing off the chart that is used both in mobile gaming devices and other iOS based on Unreal Engine 3 code base.


Although the game is compatible with the iPhone 3G, iPad 1 and iPod Touch third generation (32GB & 64GB), but the Infinity Blade II game is more advisable played on the iPhone 4 or above and the iPad 2, where the two devices that have a dual-processor chip and and higher graphics capabilities. For now the Infinity Blade II games available exclusively only for the iOS platform users.


Epic as the manufacturer of this game highly recommend playing the Infinity Blade II in IOS 5. the Infinity Blade II game is sold at a price of $7. For parents who do not want the bill because they conceded their children purchase items in this game, there is the option to disable the feature in-app purchasing.

Coming in 2012 Lenovo LePhone Windows Phone

Lenovo LePhone Windows Phone Coming in 2012
Lenovo currently confirmed that they plans to lunch smartphone based on WP7 OS. Reportedly, the Lenovo LePhone Windows Phone release date in second half of 2012. The Lenovo smartphone development with Windows Phone is indeed already had preached since leaked pictures of these phones, but this time the rumor has been confirmed officially by Yue Chen, the LePhone Product Manager.


Chen was also leaked that his party already have the release date for the Lenovo LePhone Windows Phone. On another occasion also spread rumors that Microsoft is also waiting for vendors from China, to release Windows Phone smartphone for the upcoming 2012 collaboration with retailers from China that is Suning, which has nearly 700 stores around the corners of China.


“We are indeed currently considering a Windows Phone-based LePhone product, and we already have a clear release schedule,” said Chen. “It will be released during the second half of 2012,” he added. As reported by Info Tech.

Seven Tips How to Choose an External Hard drive

SevenTips How to Choose an External Hard drive
Novatech External Hard drive
The need for large data storage very often arise because of the files that are large with video or audio formats. External hard drive is now a device is needed, especially for those who enjoy collecting songs, videos or any other data that require large storage capacity. With the external hard drive, the need for more storage media is resolved, let alone external hard drive has a Plug & Play system, making it faster, practical and easy to use.


In the market or online computer stores are so many different kinds of brands and variants of the external hard drives, a wide range of advantages offered to the consumer. Sometimes we only consider one aspect in choosing the external hard drive that is "capacity". But there are a few things to note in choosing an external hard drive, the following can be used as a guide before you decide to buy an external hard drive:


1. Casing

Choose the casing with a good material because it will affect the safety of the components in it. Choose a soft casing that is protected from shaking that could make the drive to be frequently in error.


2. The amount of Buffering or cache

Disk rotation speed is determined by the rate of data and for the hard disk expressed in RPM (Rotation Per Minute). Generally portable hard drive spins at speeds of up to 5400 RPM, but at this time has been outstanding as well as a portable hard drive with speeds up to 7200 RPM. The greater the RPM, then the sooner the process of data transfer. So, it is better to choose a high-speed hard drive.


3. Hard Drive Rotation Speed

The amount of buffer, representing the amount of memory to be cached, or stored which can be handled by a drive when it awaits the next request from the system. The amount of buffer range from 2MB to 16MB. If the larger size of the buffer, so the more data that can be stored and the faster delivery of data. However, the greater the buffer size is packed in an external hard drive, the more expensive the price of the external hard drive.


4. Plug & Play capabilities

Choose the External Hard drive is easy to use. You can try it by plugging the cord into the USB port of the computer and then the external hard drives can be directly used without installing a driver.


5. Recovery features

For the safety data on an external hard drive, it helps if you buy a hard drive that has been equipped with backup and recovery features. The existence of this feature will help you when your files are damaged or lost data caused by several things, one of which is due to a virus. By using the recovery feature, the files that are damaged can be restored.


6. Capacity

Choose the capacity of external hard drive to fit your needs. Currently, external hard drive has been available for capacities ranging from 40GB up to 2TB, but the capacity will affect the price of the device. If you are a desiner or engaged in video graphics, then you can choose the capacity of 1tb external hard drive. However, if only for storing data with a capacity that is not too large, it is better to choose a medium-sized external hard drive.

Launch postponed Call of Duty Elite for Mobile

Launch postponed Call of Duty Elite for Mobile

Call of Duty Elite for Mobile
Activision said it will postpone the launch of the Call of Duty Elite for mobile until the traffic on the network can be added.


Call of Duty Elite is one game that is sure to interest many people. Tracking network statistics / social networking overwhelmed when Call of Duty: Modern Warfare 3 for mobile version was launched last week with many new players that play simultaneously. Similarly, as quoted by Digital Trends, Thursday (11/17/2011).


The next effort is to bring some games for free services and some other services have to subscribe, it's all back on the slow-moving online. Until now, the website is moving slowly and the content itself is still limited, but every day the website performance continues to increase.


When the creators of Elite, the Beachhead Studios struggle to bring the full version of the this game online, but the speed of the network should also be adjusted to support this game. This is what makes Activision's difficult to make some decisions.


FAQ recently posted a statement of the publisher that answer all common questions of the fans and bring some new information to support the Call of Duty Elite game better.


"At a time when many people curious and eager to play Call of Duty Elite to the mobile version, we plan to release it for the IOS and the Android platform, but we should be able to handle the traffic network and add capacity so that this game can be played well," the FAQ post content.

Google Launching Music Service Officially

Google Music Service Officially Launched:


Google Music comes to offer exclusive content of the Rolling Stones, Coldplay, Busta Rhymes, Shakira, Pearl Jam and Dave Matthews Band.

Google finally introduced the Google Music to the public in the Android event, in Los Angeles last Wednesday. Google Music offers the same price with its rival, iTunes.


Android handset users in the United States (U.S.), can get access to Google Music, who has worked with major music labels, except for Warner Music. This service is not available outside the U.S., because Google has not completed negotiations with record labels, to allow selling songs elsewhere.


Unfortunately, Warner Music not included in the Google Music service, which means that Google will lack the famous names, such as Led Zepelin and Prince, which is available on iTunes.


Reported by the Guardian, Thursday (11/17/2011), analysts say, online music sales can provide an additional revenue of Google. But they reveal, Google needs to make sure Android based mobile devices can match the offerings of its competitors.


Android is an operating system number one in the world, with approximately 200 devices worldwide. But without the music service, Android-based smartphones and tablets may not appeal to consumers looking for deals on media experience.


Google offers more than 13 million tracks from Universal, Sony Music and EMI, as well as a thousand independent labels. "You can buy songs or albums directly from a computer or Android device, and will be directly added to the Google Music Library that can be accessed anywhere," said Google.


Google Music can be used on the Android 2.2 and above. To help jump-start their new music store, Google will offer a free song for consumers who download every day. Google is also trying to increase the power of Google+, the buyer can later distribute music through social networking. That is, other people can listen to the song once for free.


This technology giant also announced that the new web version of the Google Music is compatible with all browsers, including iOS.

Sony launching Cable TV Service

Sony launching Cable TV Service
Sony Cable TV Service

Sony is also reported to have expressed this idea to NBC Universal, Discovery Communications and News Corp. although full details were not informed of the idea. By delivering the content itself, Sony can save the cost of their television operations, which currently are declining condition with respect to the loss of company money every TV they sell.


According to a recent report from the Wall Street Journal, Sony is planning to launch its own cable TV service. This service will use Internet connections to deliver content to the PlayStation 3 and other devices that connect to a TV.


Sony has not confirmed about this, so maybe we can only wait how far this will go. Whether to bring the company to a better stage or even vice versa.

Will be released 2012 NokiaLumia high-end and Nokia Tablets


Paul Amsellem Head of Nokia France

 Paul himself does not say that the Lumia 710 is a BMW 3 Series, which means there may be more mobile Windows Phone lower classes which will be released by Nokia. Rumored Windows Phone Tango can support a lower resolution screen and a QWERTY form such as a Blackberry.

Paul Amsellem, Head of Nokia France, told a local newspaper Les Echos cited from Mon Windows Phone (My Windows Phone) confirms that the Nokia Lumia 800 high-end being worked on by Nokia and will not take long to be released.


Paul analogize that the Nokia Lumia 800 just like the BMW 5 Series, which means it is a good car, but not the most good. He said there is still a Nokia product that is equivalent to the BMW 3 Series and 7 Series that will accompany the Lumia 800, could have the smartphone is the Nokia 900. Nokia 900 is said to have a 4.3-inch screen, NFC, and LTE.


In addition to the smartphones, Paul alos said that Nokia will enter the tablet market by releasing a Windows 8 based tablet in June 2012. The Windows 8 for tablet will work with the ARM architecture and for Nokia is likely to rely on Qualcomm SoC. Because Windows 8 vendors likely will have similar specifications, then the design will be the main selling of the Nokia tablets. Nokia will be making something unique and original so that it can compete with iPad tablet on the market.


Finally Paul says that Nokia's market share in France has fallen far enough, from a previous 25% to 16%. He predicts that the combination of Windows Phone and Nokia will make the manufacturer will reach 22% market share.

Kindle Fire Two Release Date

Kindle Fire Two release date:

Kindle Fire 2
Amazon reportedly is preparing the release of the second-generation Kindle Fire tablet in the second quarter (Q2) 2012.


According to reports from Apple Daily, Quanta Computer as the largest computer manufacturer in the world, had given orders to begin production of the Kindle Fire two. As reported by Tech Radar, Tuesday (11/15/2011).


Since Amazon increased its orders for the Kindle Fire, the company recently added one of casing suppliers, Nishoku in the supply chain. According to reports Nishoku will start sending the chassis components at the end of 2011.


The Kindle Fire has just been released in the United States (U.S.), while the launch in the UK is still unknown until now. Something that would be interesting is whether the users in the UK will gain the first-generation Kindle Fire, or have to wait for Amazon launched the second generation simultaneously.


Unfortunately, there has still not been officially announced by Amazon, about the specs of the Kindle Fire two and what the fundamental difference between the first and second generation of the Kindle Fire.

Releases Apple iTunes version 10.5.1


iTunes 10.5.1
Apple has released a new version of iTunes. One feature on the iTunes 10.5.1 version is able to scan the user library to find the music and match the existing content on the iTunes Music Store.

Apple, charge for the iTunes subscription of $24.99 per year. iTunes users can store up to 25 thousand songs in Apple's cloud servers. The Cloud service allows users to synchronize files, applications and content between Apple devices.

Reported by Business Today, Tuesday (11/15/2011), if the music you are looking for matches, then the user does not need to download and can listen to it anywhere. In fact, this software runs fine on any device that running iOS.


Unlike Google and Amazon, Apple gain advantage through its partnership with four major music labels. So the company only needs to store one copy of each song on the cloud servers, eliminating the download process for users and 'redundancy' for the server.


The release of this service, apparently also intended to compete with Google Music. In the invitation email sent last Friday, the search giant said it would hold an event called 'These Go To Eleven' on Wednesday in Los Angeles.


Technology news site, Verge reported that it would be a debut for Google Cloud Music services for the first time.

Saturday, December 3, 2011

Mengganti Tulisan Postingan Lama dan Postingan Baru dengan gambar

Mengganti Tulisan Postingan Lama dan Postingan Baru dengan gambar

: Biasanya di bagian bawah artikel Anda terdapat tulisan seperti "Older Post / Newer Post atau Posting Lama / Posting Baru". Nah mungkin awal -awalnya Anda tidak mengetahui maksudnya tulisan tersebut. Ya Posting Lama / Baru adalha sebuah Link yang menuju ke artikel - artikel sebelumnya dan juga artikel - artikel yang baru. Nah mungkin Anda ingin mengganti tulisan tersebut dengan tulisan yang lain, misalnya dengan tulisan "Artikel Abdi Sebelumnya" atau "Halaman Lama" atau bahkan dengan gambar. Caranya adalah :
  1. Masuk ke halaman Dasboard > Rancangan > Edit HTML
  2. Beri tanda centang pada kotak "Expand Widget Template"
  3. Cari kode <data:newerPageTitle/> dengan menekan "Ctr+F" pad keyboar.
  4. Ganti tulisan 'Posting Terbaru' dengan gambar panah kiri yang anda inginkan.

    contoh kode:

    <a class='blog-pager-newer-link' expr:href='data:newerPageUrl' expr:id='data:widget.instanceId +&quot;_blog-pager-newer-link&quot;' expr:title='data:newerPageTitle'><data:newerPageTitle/></a>

  5. ubah kode berwarna merah menjadi seperti di bawah ini :

    <a class='blog-pager-newer-link' expr:href='data:newerPageUrl' expr:id='data:widget.instanceId +&quot;_blog-pager-newer-link&quot;' expr:title='data:newerPageTitle'><img src='https://blogger.googleusercontent.com/img/b/R29vZ2xl/AVvXsEhoYH54VZh8PheDgMfeAY1f19E_kQWaPyGRTsK46NenaW1mISCHaE4bOPaxn7r_28MzBfcfZ9ngIj-l51GRKNqYlYu3uWb0FuSyBu0SaPCXY-JHmd-nm8FAe8jDh-xUFSWbUaYyXsvhJxRj/' style='border:none;'/></a>

  6. Ganti tulisan 'Posting Lama' dengan gambar panah kanan yang anda inginkan.

    <a class='blog-pager-newer-link' expr:href='data:newerPageUrl' expr:id='data:widget.instanceId +&quot;_blog-pager-newer-link&quot;' expr:title='data:newerPageTitle'><data:newerPageTitle/></a>

  7. ubah kode berwarna merah menjadi seperti di bawah ini :

    <a class='blog-pager-newer-link' expr:href='data:newerPageUrl' expr:id='data:widget.instanceId +&quot;_blog-pager-newer-link&quot;' expr:title='data:newerPageTitle'><img src='https://blogger.googleusercontent.com/img/b/R29vZ2xl/AVvXsEh6HYZrqu-TyrD47VkhVSBgDncjgu641R9H7_dPDDnTaYgI2KzhOC23wVeQRrN3wlIo51rLxAHOQEOssUbrsYMqpcAdSQa_JV5Wr8it6rGYkT65xx4viLH4cmx3JcA-cTO4cCjYbuWGgE_p/' style='border:none;'/></a>

  8. Ganti tulisan 'Home' dengan gambar rumah.

    contoh kode:

    <b:if cond='data:blog.homepageUrl != data:blog.url'>
    <a class='home-link' expr:href='data:blog.homepageUrl'><data:homeMsg/></a>
    <b:else/>
    <b:if cond='data:newerPageUrl'>
    <a class='home-link' expr:href='data:blog.homepageUrl'><data:homeMsg/></a>
    </b:if>
    </b:if>

  9. ubah kode berwarna merah menjadi seperti di bawah ini :

    <b:if cond='data:blog.homepageUrl != data:blog.url'>
    <a class='home-link' expr:href='data:blog.homepageUrl'><img src='https://blogger.googleusercontent.com/img/b/R29vZ2xl/AVvXsEhs2nyoZ1_QV7Wwo6vRARdrS8b_2M-puNl-EqYFArvWGh4LJBeVpwKk-zc2J760jGxJGzGE-P77tqHiDFiw1B5bgu66WpXhy14-GboTFEa5Y2udSNohqTl-xmORQHrt5T9nw_YWBy5boL49/' style='border:none;'/></a>
    <b:else/>
    <b:if cond='data:newerPageUrl'>
    <a class='home-link' expr:href='data:blog.homepageUrl'><img src='https://blogger.googleusercontent.com/img/b/R29vZ2xl/AVvXsEhs2nyoZ1_QV7Wwo6vRARdrS8b_2M-puNl-EqYFArvWGh4LJBeVpwKk-zc2J760jGxJGzGE-P77tqHiDFiw1B5bgu66WpXhy14-GboTFEa5Y2udSNohqTl-xmORQHrt5T9nw_YWBy5boL49/' style='border:none;'/></a>
    </b:if>
    </b:if>

  10. Simpan Template dan lihatlah hasilnya.


BACA JUGA!
- Cara Menghilangkan Tulisan Subscribe To Post (Atom) Blog
- Cara membuat related post bergambar
- Cara membuat tag cloud
- Membuat header menjadi dua kolom
- Membuat buku tamu/shoutmix tersembunyi
- Tabel kode warna css
- Cara mudah Memasang shoutmix bersama
- Cara memasang widget alexa pada blog
- Cara meningkatkan alexa rank blog
- membuat kotak daftar isi blog
- Cara Mengukur seberapa berat blog/web kamu
- Cara supaya domain co.cc bisa diakses tanpa www(redirect tanpa www)
- Merubah Domain Blogspot menjadi co.cc
- Membuat scroll pada komentar blog
- Fungsi Gadget Followers pada Blog
- Cara mudah memasang meta tag blogger
- Mengubah tampilan iklan kumpulblogger
- Cara membuat label menjadi berwarna
- Membuat widget hanya muncul pada postingan
- Cara membuat daftar isi otomatis pada blogger


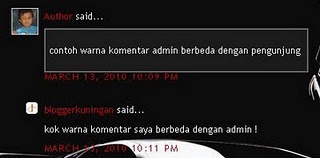
Membuat Warna Kotak Komentar Admin Berbeda pada Blogger

Membuat Warna Kotak Komentar Admin Berbeda pada Blog: Cara Membuat warna kotak komentar admin berbeda dengan pengunjung teryata sangat mudah,

Selain membuat scroll pada komentar blog hal ini bisa jadi salah satu cara agar blog kamu terlihat lebih cantik...Langsung saja sob..nie caranya,aku buat simple aja ya..semoga faham!!


Membuat Warna Kotak Komentar Admin Berbeda pada Blog


  1. Masuk ke akun Blogger Sobat.
  2. Klik Rancangan > Edit HTML.
  3. Klik Download Template Lengkap untuk berjaga-jaga kalau nanti terjadi kesalahan kita dapat dengan mudah mengembalikan template seperti semula.
  4. Beri tanda centang di Expand Template Widget.
  5. Cari kode ]]></b:skin> Tekan Ctrl + F lalu isikan kode untuk mempercepat pencarian.
  6. Copy kode di bawah ini lalu paste di atas kode tersebut.


    .comment-body-author {

    background: #fee6e6; /* Warna Background */

    border:2px dotted #d31111; /*Border*/

    margin:0;

    padding:0 0 0 0px;

    }


    #fee6e6 merupakan warna untuk latar belakang, silakan ganti kode warnanya untuk mengubah warnanya.

    2px dotted #d31111 adalah border style dot dengan ketebalan 2 piksel dan berwarna #d31111. Silakan diubah sesuai keinginan Sobat.

  7. Cari kode seperti di bawah ini.


    <b:if cond='data:comment.authorUrl'>

    <a expr:href='data:comment.authorUrl' rel='nofollow' target='_blank'><data:comment.author/></a>

    <b:else/>

    <data:comment.author/>

    </b:if>

    <data:commentPostedByMsg/>

    </dt>


    <dd class='comment-body'>

    <b:if cond='data:comment.isDeleted'>

    <span class='deleted-comment'><data:comment.body/></span>

    <b:else/>

    <p><data:comment.body/></p>

    </b:if>

    </dd>


    <dd class='comment-footer'>


  8. Letakkan kode berikut dibawah kode

    <data:commentPostedByMsg/>

    </dt>


    <b:if cond='data:comment.author == data:post.author'>

    <dd class='comment-body-author'>

    <p><data:comment.body/></p>

    </dd>

    <b:else/>


  9. Dan letakkan kode </b:if> dibawah kode


    <dd class='comment-body'>

    <b:if cond='data:comment.isDeleted'>

    <span class='deleted-comment'><data:comment.body/></span>

    <b:else/>

    <p><data:comment.body/></p>

    </b:if>

    </dd>


  10. Sehingga hasilnya semuanya menjadi seperti di bawah ini.


    <b:if cond='data:comment.authorUrl'>

    <a expr:href='data:comment.authorUrl' rel='nofollow' target='_blank'><data:comment.author/></a>

    <b:else/>

    <data:comment.author/>

    </b:if>

    <data:commentPostedByMsg/>

    </dt>

    <b:if cond='data:comment.author == data:post.author'>

    <dd class='comment-body-author'>

    <p><data:comment.body/></p>

    </dd>

    <b:else/>

    <dd class='comment-body'>

    <b:if cond='data:comment.isDeleted'>

    <span class='deleted-comment'><data:comment.body/></span>

    <b:else/>

    <p><data:comment.body/></p>

    </b:if>

    </dd>

    </b:if>

    <dd class='comment-footer'>
    Kode yang berwarna hitam adalah tambahanya,itu yang perlu diingat.


  11. SIMPAN TEMPLATE.

Membuat scroll pada komentar blogger

Membuat scroll pada komentar blog: Para rekan blogger sekalian...kita berjumpa lagi dlm acara tutorial kali ini, dengan judul "Membuat Scroll pada komentar blog". Apa itu scroll ? Kalau ini teman2 pasti sudah pada tahu, tu lho di bagian kanan browsernya teman2...yang biasanya membuat gulung2 / geser halaman web/blog, nah itulah yang namanya scroll. Selama si empunya nulis2 tutorial masalah blogging di blogger, ini adalah postingan yang kedua yang membahas mengenai pembuatan scroll, sebelumnya saya sudah nulis tutorial "Cara Membuat kotak Scroolbar pada blog" tapi jika kamu pengen membuat kotak komentar kamu juga mempunyai fungsi scroll ada cara mudah yang bisa kamu lakukan, caranya sbb:
  • lalu klik Tata Letak,
  • kemudian Klik Edit HTML.
  • Dan yang paling penting jangan lupa centang si "expand widget template"
  • Cari kode yang mirip seperti ini:

    <dl id='comments-block'>
    <b:loop values='data:post.comments' var='comment'>
    <dt class='comment-author' expr:id='&quot;comment-&quot; + data:comment.id'>
    <a expr:name='&quot;comment-&quot; + data:comment.id'/>
    <b:if cond='data:comment.authorUrl'>
    <a expr:href='data:comment.authorUrl' rel='nofollow'><data:comment.author/></a>
    <b:else/>
    <data:comment.author/>

    </b:if>
    <data:commentPostedByMsg/>
    </dt>
    <b:if cond='data:comment.author == data:post.author'>
    <dd class='comment-body-author'>
    <p><data:comment.body/></p>
    </dd>
    <b:else/>
    <dd class='comment-body'>
    <b:if cond='data:comment.isDeleted'>
    <span class='deleted-comment'><data:comment.body/></span>
    <b:else/>
    <p><data:comment.body/></p>
    </b:if>

    </dd>
    </b:if>
    <dd class='comment-footer'>
    <span class='comment-timestamp'>
    <a expr:href='&quot;#comment-&quot; + data:comment.id' title='comment permalink'>
    <data:comment.timestamp/>
    </a>
    <b:include data='comment' name='commentDeleteIcon'/>
    </span>
    </dd>

    </b:loop>
    </dl>
    Nah, kalau sudah memperhatikan kode di atas, sekarang tambahkan kode berwarna merah,yang akhirnya menjadi seperti berikut:

    <div style='overflow:auto; width:ancho; height:350px;'>
    <dl id='comments-block'>
    <b:loop values='data:post.comments' var='comment'>
    <dt class='comment-author' expr:id='&quot;comment-&quot; + data:comment.id'>
    <a expr:name='&quot;comment-&quot; + data:comment.id'/>
    <b:if cond='data:comment.authorUrl'>
    <a expr:href='data:comment.authorUrl' rel='nofollow'><data:comment.author/></a>
    <b:else/>
    <data:comment.author/>

    </b:if>
    <data:commentPostedByMsg/>
    </dt>
    <b:if cond='data:comment.author == data:post.author'>
    <dd class='comment-body-author'>
    <p><data:comment.body/></p>
    </dd>
    <b:else/>
    <dd class='comment-body'>
    <b:if cond='data:comment.isDeleted'>
    <span class='deleted-comment'><data:comment.body/></span>
    <b:else/>
    <p><data:comment.body/></p>
    </b:if>

    </dd>
    </b:if>
    <dd class='comment-footer'>
    <span class='comment-timestamp'>
    <a expr:href='&quot;#comment-&quot; + data:comment.id' title='comment permalink'>
    <data:comment.timestamp/>
    </a>
    <b:include data='comment' name='commentDeleteIcon'/>
    </span>
    </dd>

    </b:loop>
    </dl>
    </div>

  • Klik simpan template
NB:eman2 juga bisa mengatur panjang lokasi kotak komen yang ber-scroll itu dengan cara mengatur nilai pada kode <div style='overflow:auto; width:ancho; height:350px;'> nah perhatikan pada bagian:350px . Angka tersebut dapat tman2 atur sesuai keinginan tman2, tapi lihat dulu hasil kerjaannya tman2 pada kolom komentar postingannya, apakah sudah sesuai dengan ukuran kotak komen yg tman2 inginkan


Tuesday, November 29, 2011

Cara menampilkan Widget Di Home Page saja

Dulu waktu pertama kalie melihat blog temen ada yang aneh/unik, aq langsung pengen mencoba mempelajari bagaimana cara membuatnya,sama halnya saat melihat blog dari template buatan kang rohman yang ada sebagian widgetnya hanya muncul pada homepage,sedangkan saat di klik postinganya halamanya berubah,jika kamu belum tau cara membuat widget yang hanya tampil pada postingan ni aq punya tutorialnya,ternyata mudah juga.


  1. Masuk ke blogger.com
  2. Log-in dengan username dan password kamu
  3. Menuju layoutEdit HTMLCentang "expand widget template" nya, karena kalau tidak kode di bawah nanti tidak akan keluar.Sebenarnya kita hanya perlu menambah kan 2 tag kode saja,lihat kode dibawah ini:


<b:widget id='HTML1' locked='false' title='Blog Upp' type='HTML'>
<b:includable id='main'>
<b:if cond='data:blog.homepageUrl == data:blog.url'>
<!-- only display title if it's non-empty -->
<b:if cond='data:title != ""'>
<h2 class='title'><data:title/></h2>
</b:if>
<div class='widget-content'>
<data:content/>
</div>

<b:include name='quickedit'/>
</b:if>
</b:includable>
</b:widget>


Lihat kode yang berwarna merah tadi,itu adalah selipan kedua tag kode tadi, dan warna biru yang berkedip itu adalah judul wigetkamu. silahkan aja sesuaikan dengan judul widget yang ada pada blog kamu jika kamu pengen widget tersebut hanya tampil hanya pada homepage,

Tingkatkan Traffic blog dengan Cara Alami Memakai rumus t = v1+v2

Ketika anda baca judul postingan ini mungkin anda bingung,apa sih rumus t=vi+v2, Saya aja bingung banget awalnya, kemudian saya lanjutkan membaca postingan dibawah ini. bagi yang tertarik coba aja trik ini. tapi ingat harus jujur ya!!!!!


---------------- Copy mulai disini------------------

Mohon baca baik-baik lalu terapkan dengan benar....

Sebuah filosofi mengatakan "Honesty is The Best Policy (Kejujuran adalah politik/strategi terbaik)" , inilah yang akan kita buktikan.... apakah konsep kejujuran bisa kita olah menghasilkan traffic dan popularity yang lebih hebat dari konsep rumit para expert webmaster atau pakar SEO..?... Saya yakin bisa asal konsep ini di jalankan dengan benar..., bila ini di terapkan pada web anda sesuai ketentuan maka:

-Web anda akan kebanjiran traffic pengunjung secara luar biasa hari demi hari, tanpa perlu repot-repot memikirkan SEO atau capek-capek promosi keberbagai tempat di dunia internet.

-Web anda akan kebanjiran backlink secara luarbiasa hari demi hari, tanpa perlu repot-repot berburu link keberbagai tempat di dunia internet.

Jika Albert Einstein memakai persamaan e=mc2 untuk menggabungkan potensi masa dan kecepatan cahaya untuk menghasilkan energi nuklir yang luar biasa itu ,maka kita akan memakai persamaant=v1+v2 untuk mnggabungkan potensi web saya dan web anda untuk menghasilkan traffic dan popularity yang luar biasa pula.

Jika Einstein menggunakan atom plutonium dan uranium untuk membuat bom nuklir, maka kita menggunakan Kejujuran dan ketepatan untuk membuat bom traffic dan popularity ini.

Yang perlu anda lakukan adalah ikuti langkah-langkah berikut :

1. Buat posting artikel seperti posting saya ini, atau copy-paste posting ini dari kalimat Copy mulai disinisampai kalimat Selesai, dan juga diberi berjudul : t=v1+v2 ,Cara meningkatkan traffic dan popularity dengan cepat dan alami.

2. Selanjutnya Copy atau buat KALIMAT SAKTI yang ada di bawah nomor 3 ini lalu pasang di web anda pada bagian yang paling mudah dilihat pengunjung, misalnya di bagian atas sidebar

3. Pindahkan atau ganti link atau alamat url posting (disini-1) dengan alamat url anda dan (disini-2) dengan alamat postingan URL saya, untuk mengetahui alamat url posting saya dan posting yang anda buat adalah bisa dengan meng-klik judul/title posting yang kita buat ini lalu copy address bar nya

Berikut tulisan "KALIMAT SAKTI" yang perlu anda pasang di bagian web anda (setelah di ganti link url-nya sesuai ketentuan di atas)

"Ingin meningkatkan traffic pengunjung dan popularity web anda secara cepat dan tak terbatas...? Serahkan pada saya..., Saya akan melakukannya untuk anda GRATIS...!..Klik disini 1 dan disini 2
-Jadi setelah KALIMAT SAKTI ini di letakan di web anda maka: jika pengunjung meng-klik link disini-1akan menuju link posting anda, dan jika meng-klik disini-2 akan menuju link posting saya...dan seterusnya kan terus terjadi mata rantai yang tak terputus seperti itu...

4. Selesai, siapkan counter tracker dan pengecek link misalnya sitemeter dan technorati untuk melihat hasil banjir traffic dan linkback web anda.

Apa itu t=v1+t2...?
t : Jumlah traffic yang akan di peroleh web anda dalam suatu hari
v1 : Jumlah pengunjung web anda dalam suatu hari
v2: Jumlah pengunjung yang dimiliki v1 (pengunjung dari pengunjung web anda) dalam suatu hari.

Traffic:
Misalnya, web saya ini atau web anda dalam sehari memiliki rata-rata pengunjung 50 orang.., dan semuanya menerapkan konsep kita ini (KALIMAT SAKTI) dengan benar, dan dari 50 orang itu masing-masing memiliki 50 orang pula pengunjung dari blog-nya , maka web kita akan berpeluang di kunjungi 50 ditambah 50 x 50 orang pada hari itu = 2550 orang , dan akan berpeluang terus meningkat pula hari demi hari ,karena setiap hari selalu ada pengunjung baru di dunia internet, setiap hari juga ada blogger atau web baru di dunia internet...BUKTIKAN

Popularity:
Misalnya, web kita memiliki pengunjung 50 orang dalam suatu hari, dan semuannya menerapkan konsep ini , maka dalam hari itu web anda akan mendapatkan 100 linkback ke web anda, yaitu sebuah link pada KALIMAT SAKTI dan sebuah link pada link saya di kalikan 50. dan akan berpeluang meningkat terus hari demi hari....

Kenapa perlu di buat link link anda dan link saya pada posting...?
...hal ini untuk menjaga keabadian link kita, karena seperti kita tau link pada posting lebih kecil kemungkinannya terhapus....

Bisakah kita berbuat tidak fair atau tidak jujur menyabotase konsep ini, misalnya "menghilangkan semua link asal" lalu di isi dengan web/blog kita sendiri...? ....Bisa, dan konsep ini tidak akan menjadi maksimal untuk membuktikan Kejujuran adalah strategi/politik terbaik.....Tapi saya yakin bahwa kita semua tak ingin menjatuhkan kredibilitas diri sendiri dengan melakukan tindakan murahan seperti itu...

jadikan hidupmu lebih hidup dengan ngeblog!!!

Cara mencari / Mengetahui Blogger Satu Daerah

Memang senang rasanya kalau bertemu teman - teman blogger, apalagi teman satu daerah. Ketemunya di internet lagi. Teman bisa buat tukeran link, bisa buat tukeran ilmu seputar blog. Dan bisa bersama-sama menunjukan kebanggaan daerahnya. Seperti Obyek Wisata, makanan khas, dll.

Kita bisa mengetahui teman satu daerah, atau teman blogger dengan daerah lain hanya dengan memasukan alamat berikut di address bar browser anda :

Blogger seluruh Indonesia :
http://www.blogger.com/profile-find.g?t=l&loc0=ID

Blogger dalam satu provinsi :
http://www.blogger.com/profile-find.g?t=l&loc0=ID&loc1=Jawa+Barat

Blogger dalam satu kota/ kabupaten :
http://www.blogger.com/profile-find.g?t=l&loc0=ID&loc1=Jawa+Barat&loc2=Purwakarta


Keterangan :

Silakan ganti hurup yang berwarna biru sesuai dengan kode negara, nama provinsi dan nama kota yang ingin anda cari.

ID : kode untuk Indonesia.

Jawa+Barat : nama provinsi. Tanda + berfungsi sebagai spasi pada nama provinsi dengan dua kata atau lebih.

Purwakarta : nama kota/kabupaten

Sunday, November 27, 2011

Pinoy BB5 Unlocker version 5.0 by bryantfurry

Pinoy BB5 Unlocker version 5.0 by bryantfurry:

Pinoy BB5 Unlocker v5.0 by bryantfurry:


Pinoy BB5 Unlocker v5.0 by bryantfurry


Supported Models:

Pinoy BB5 Unlocker v5.0 by bryantfurry

unlock free

factory reset bb5

repair SL zone


Download


Download Now


nokia handset ways free download

nokia handset ways free download:

nokia handset ways by irfan gsm:


Supported Models:


nokia handset solution

x3,x6,N97,N97 mini,N96,N93,N93i,N92,N85

N86,N82,N81,N80,N79,N78,N77,N76,N73,N70

E71,E66,E65,1200,6680,6300,6120,6020,5730

5200,1110,handset,N95,6300


Download


Download Now


Free NOKIA DCT4 Plus RSA Unlocker free

Free NOKIA DCT4 Plus RSA Unlocker free:

DCT4 Plus RSA Unlocker free:


DCT4 Plus RSA Unlocker free

Supported Models:

FREE DCT4 Plus RSA UNLOCKER v0.1.1

* Free DCT4++ RSA all models unlock

* You do not need any LOGS, CREDITS, ACTIVATIONS or box except UFS/JAF interface

* To unlock DCT4++ phones please use Unlock button

* Do not need to worry about firmware and UPP version

* No more patch files

* Phones are really unlocked

* You can use FBUS and Easy Cable

* Safe software

* Working with JAF interface (UFS support coming soon)

* Calculation is server based and take about 1 second per phone and is totally free for all


Supported models:


- NOKIA 1110i RH-93

- NOKIA 1112b RH-92

- NOKIA 1200 RH-99

- NOKIA 1200 RH-100

- NOKIA 1202 RH-112

- NOKIA 1208 RH-105

- NOKIA 1208b RH-106

- NOKIA 1209 RH-105

- NOKIA 1600b RH-66

- NOKIA 1661 RM-305

- NOKIA 1662


- NOKIA 1650 RM-305

- NOKIA 1680 Classic RM-394

- NOKIA 1680 Classic-2b RM-490

- NOKIA 2220 Slide RM-590

- NOKIA 2310 RM-189

- NOKIA 2320 Classic RM-514

- NOKIA 2320 Classic-2b RM-515

- NOKIA 2323 CLassic RM-543

- NOKIA 2330 Classic RM-512

- NOKIA 2600 RH-60

- NOKIA 2600a RH-60

- NOKIA 2600 Classic RM-340

- NOKIA 2610 RH-86

- NOKIA 2610b RH-87

- NOKIA 2626 RM-291

- NOKIA 2630 RM-298

- NOKIA 2630b RM-299

- NOKIA 2660 RM-292

- NOKIA 2660b RM-293

- NOKIA 2680 Slide RM-392

- NOKIA 2680 Slide-2b RM-500


- NOKIA 2720 Fold RM-519

- NOKIA 2760 RM-258

- NOKIA 2760b RM-259

- NOKIA 2760h RM-391

- NOKIA 5000 RM-362

- NOKIA 5030 XM RM-524

- NOKIA 6030b RM-75

- NOKIA 7070 RH-116

- NOKIA 7100s RM-438


Download


Download Now


toysoftca_helper_ version1.9

toysoftca_helper_ version1.9:

toysoftca_helper_ version1.9


input pin and then you fill in the code into your blackberry

good luck


Download Now


vnbbKG_version2.0

vnbbKG_version2.0: vnbbKG_version2.0


- AddOnis

- BerryBuzz 2.x

- BerryWeather 1.x

- BerryPopup

- BerrySilent

- BerrScroll (Strom)

- Smart Alert

- Blink

- FancyChar 2.x

- Meter Berry

- Intellilauncher

- QuickLauch

- QuickPull Pro v3

- TiggitMail 1.1.18.1

- ProfilerPro v1

- Fake Call v2

- Wifi File Transfer

- Safe Box 0.0.3

- Tiny alarm

- Camera ToGo 0.3


masukan pin kamu lalu isikan kode tersebut ke blackberry kamu


input pin and then you fill in the code into your blackberry

good luck


Download Now


mblware_helper_version1.0.3

mblware_helper_version1.0.3:


mblware_helper_version1.0.3


enter your pin and then you fill in the code into your blackberry


Download Now


Share

Twitter Delicious Facebook Digg Stumbleupon Favorites More